Tuesday, December 18, 2007

Data View Web Part - Add Link to view properties form

Well... this must be the shortest tip I evet posted, and tell you the truth - its for me more than it is for you.

Every time I add a data view web part (DVWP) using the SharePoint Designer I have to look for how to add a link to the view item properties window.

Well, in case you didnt know this - DVWP has some properties that allow to build that string dynamically according to the current list. This is only done if you add a "List View" web part, and use the SharePoint Designer option to convert it to data view (menu: convert to XSLT data view, what we call DVWP).


Well, the solution is very easy, inside a <a>tag surrounding the @Title value, just add this tokens:
href="{$URL_Display}?ID={@ID}"
and thats it!


So, now I have where to get it from when I need it :) and maybe you will find it usefull as well...

Tuesday, December 11, 2007

Using InfoPath Forms Server with anonymous users

For so long I have been trying to convince my customers that the right combination of InfoPath, MOSS and workflow can solve 70% of their day to day business needs.

Well, guess what – I finally succeeded.

Only to learn that by default – forms server does not allow anonymous users to create new forms.

Well, my customer wanted to implement a “contact us” and “register to…” forms on his WCM MOSS internet site that will (of course) be published on the internet and allow any potential customer to fill in these forms with no need for logging in or registering for their site.

So, the solution for this consisted of 2 major steps.

Step 1 – defining out SharePoint site to use forms authentication provider.


I extended my AD web application (i.e. http://moss.kwizcom.com ) to a new web application (i.e. http://forms.kwizcom.com ) that uses forms authentication – this way I could create a simple user that has no privileges at all except to create items in the forms library (no edit / delete as well).

Step 2 – setting up a default logon user for anonymous users.


After step 1, all I had to do is to create a forms authentication user named: Internet User and give him write access to the forms library. Now, I added some code to auto login with that user when anyone browses to this web application http://forms.kwizcom.com.

For more information about completing step 1 you can see may blogs articles – simply google it.

I like Andrew connell’s one here: http://www.andrewconnell.com/blog/articles/HowToConfigPublishingSiteWithDualAuthProvidersAndAnonAccess.aspx

After you have forms authentication enabled on your second web application, the solution is rather easy.
  1. Create an InfoPath form, save it and publish it to a document library on your SharePoint server
  2. Create a new permission level on your site collection for “Add Only Read Only Permission”
    1. Go to Site Settings – top level site settings
    2. Click on advanced permissions
    3. On the “Settings” menu click on “Permission Levels”
    4. Add a new permission level named “Add Only Read Only Permission”
    5. Select only the “Add Items” check box (others will be auto selected – leave them)
    6. Click “Create”
  3. Create a new forms user named: Internet User
    1. Use the ASP.Net application to create a new user as explained in the Andrew Connell blog post above
  4. Give Internet User “Add Only Read Only” permission on the published form library
    1. Browse to the document library
    2. On the “Settings“ menu click “X Library Settings”
    3. Click on “permissions for this document library”
    4. If you don’t see the “new” menu item – you will have to break permissions for this library by clicking “Actions” and then “Edit Permissions”
    5. Click “New”, select Internet User give user permission directly to “Add Only Read Only Permission” permission level.
  5. Set up auto login for Internet User
    1. Go to the http://forms.kwizcom.com web root folder (by default: under c:\inetpub\wwwroot\wss\virtualdirectories\*
    2. Locate the global.asax file, back it up and open it in notepad
    3. Add this lines to the file to enable auto login as Internet User,
      replace [password] with the password you given the user.
      <script runat="server">
      public void FormsAuthentication_OnAuthenticate(object sender, FormsAuthenticationEventArgs args)
      {
      if (Membership.ValidateUser("Inernet User", "[password]"))
      {
      FormsAuthentication.SetAuthCookie("Inernet User", true);
      }
      }
      </script><.div>
    4. Save the file and close it.
Now we have to prepare the link for filling out this form using the browser.
To do so you will need a client PC that does not have InfoPath installed, browse to http://moss.kwizcom.com to the forms library, and click “New” on the forms library.
The forms server will open a browser based form for you to fill in.
Copy the URL of the create form page and replace http://moss.kwizcom.com with http://forms.kwizcom.com , replace moss with forms anywhere you see it in the query string as well, except for the “Source=” query string parameter.

That’s it! Simply put that URL at your site where you want users to create forms from and you are done!

Note: you might want to prevent user from browsing to http://forms.kwizcom.com and redirect them to the http://moss.kwizcom.com. This can be done in several ways. For demo purposes you could add this javascript to your master pages to make them do the redirect for you:

<script>
if(window.location.href.toLowerCase().slice(0,12) == “http://forms”)
window.location.href = window.location.href.toLowerCase().replace(“http://forms”, “http://moss”)
</script>

Wednesday, December 5, 2007

SharePoint How To

Hi,
we have started our new site, “SharPoint How To”, a site that contains demonstrations of how-to’s of SharePoint…
the site currently has a nice selection of videos showing how to complete common tasks in ShareSharePoint, and hey, this is only the beginning…

Feel free to visit and send us you comments and wishes.
Thanks
Uri

Tuesday, November 20, 2007

Importing Data from AD to InfoPath 2007 Form Template (Code free)

Hi all,
Several of my customers have learned about the new feature of MOSS that includes publishing InfoPath forms to the server and thus allowing users that does not have InfoPath installed to fill in forms with no need for distributing nor purchasing InfoPath for each client.
One of the things they all have in common is that they all work in a Microsoft Active Directory environment and wish the form to load Meta data from the current user and to fill in the form with that data.

Now, InfoPath and AD does not have a method for creating a direct connection, but since all of our users also utilize the Microsoft Office SharePoint Server (MOSS) forms server – this means they can take advantage of other features and capabilities of MOSS for this problem.
MOSS connects to your AD easily and builds a user profile based on the data stored in AD for each user. This part is easy enough to perform so I will not elaborate further on that here.
Once your MOSS “knows” your users, you can make use of its web services to retrieve all users list, a specific user profile and also the current user profile.
Here I will demonstrate how to create a form that loads current user profile data as stored in AD without writing any bit of code.

The only thing that needs to be done is to define a connection to a certain web service that already exists in your SharePoint site out-of-the-box (OOTB).

Step 1: Create a blank form template
1. Click file->design a form template


2. Select “Blank”


3. Click OK

Step 2: Setting up the web service connection

1. Create a new data source connection.

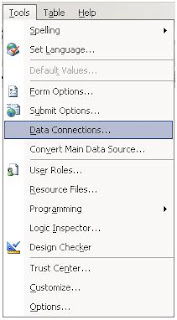
Go to tools –>Data connection


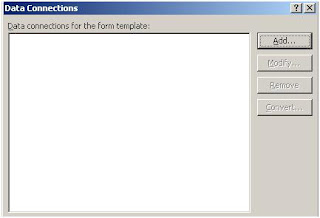
2. In the ”Data connections” dialog Click on Add


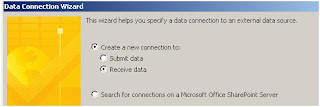
3. Select create a new connection to - Receive data Click next


4. Select Web service as the source type


5. Insert the Following web service name: http://<servername>/_vti_bin/userprofileservice.asmx?wsdl


6. Replace <servername> with your SharePoint server name and click next


7. From the operations drop down list select GetUserProfileByName


8. In MOSS, calling this operation without sending a user name will return current user’s profile.

9. Click next keeping the defaults in every screen until you can hit Finish
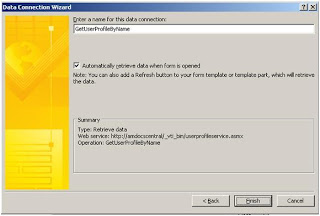


10. Close the Data connection window.


Step 3: viewing and choosing the AD details we wish to import:

Now, we need to insert the AD information to the correct fields. To do so, we first need to see what kind of data we can use.
Since the users profile may include different properties according to software installed on your organization and other dependencies, the web service results returns a set of “name-value” collection that we can use in order to get re results we need.
So – first, we have to find the “name” of the property we need and use it to get its value from the web service.
Here is how it is done:

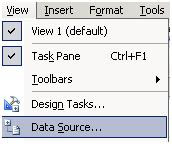
1. To see all the available fields click on View -> Data source

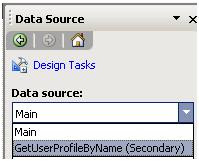
2. In the Data source drop-down select the one we just created.

3. Expand the DataFields container node and select the following fields in the results:


4. In the drop-down menu on the selected nodes select repeating table and place it in the form.


5. This created a repeating table with all data returned by the web service. To see all the AD fields available to you, Click preview in the tool bar.


6. Now, locate the property you need and copy its name
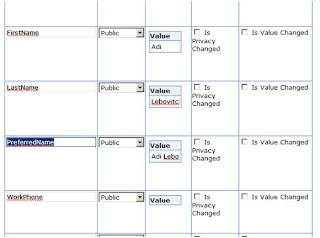

7. Return to the design mode by clicking close preview.


Step 4: placing the AD details in the controls:
Now the only thing left for us to do is place the field we chose earlier in step 3 and define the control to show that field’s info.


1. In the form double-click the control you wish to fill


2. In the control properties click on

to open the function editor


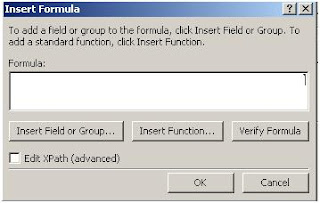
3. Then click on insert Field or group.

4. In the next window select to data source you created


5. Expand all the folders under dataFields until you can select the Value node.

6. This inserts one of the “values” we got in the web service response. Now we have to make it “filter” the values by the property name we want.

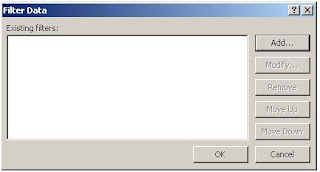
7. Click on filter Data button. In the pop up window click on add

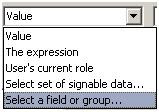
8. In the next window select the following options

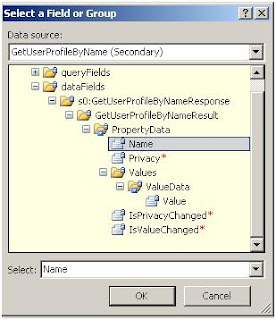
9. And select the “name” node from our service data source:


10. Click ok. Then Select type text and enter the property you copied in the previous section as the value


11.Click OK to confirm and close all the pop-ups.


12. Click preview in the tool bar to see the results.


Now your form displays the user preferred name as it was entered in the AD without writing 1 line of code!

Important:
Your document must be fully trusted in order to execute the web service correctly. To do so please check the tools-forms options form security options.


This is a great demonstration how several Microsoft products can be combined to create excellent customer-specific solutions with just utilizing the capabilities of the OOTB features.

Post by: Adi Lebovich and Shai Petel.

Thanks,

Tuesday, November 6, 2007

Hide "New" document menu item in document library views

Hi all,

Recently my customer asked me to do something I generally do not approve of - changing the basic behavior of a SharePoint document library.

I usually for maintaining a solid user experience and believe it is one of the many strong point SharePoint has to offer by giving the user a familiar environment throughout his LOB systems - if it’s a team workspace, an internal organization portal or (new in 2007) the organization internet portal.

Well, with all that said - one of my customers still insisted on removing the "new" document menu item from all the document libraries and allowing only to "upload" documents...

Like a good SharePoint-boy I immediately thought my solution will be creating a new feature that uses the tag for hiding different menu items in SharePoint.

To my surprise I learned that the “new” menu item in the list view web part tool bar is not listed as a in any feature, so it cannot be removed as so.

Finding no other choices, I created this JS code in a separate JS file and referenced it from all master pages involved…

If checks if the current page has a document library view and if so – locate and hide its “new” menu item…

Just add it to your page, and call HideNewDocumentMenuItem on body’s load:
function HideNewDocumentMenuItem()
{
try
{
if( ctx )
{
if( ctx.listBaseType == 1 )
{
var tables = document.getElementsByTagName("table");
for(var i=0; i< tables.length; i++)
{
if( tables[i].id.indexOf("NewMenu") > 0 )
{
var elm = tables[i];
elm.parentElement.parentElement.style.display="none";
elm.parentElement.parentElement.nextSibling.style.display="none";
}
}
}
}
}
catch(e){}
}


Hope this helps you guys,
If you have a more elegant solution – please post a comment… I’ll be happy to hear.

Shai Petel (Ben Shooshan).

Sunday, November 4, 2007

Nested Master Pages in SharePoint - Troubleshoot

Recently one of my customers needed to maintain basic layouts rules while allowing different solution creators in his company to generate new master pages for their applications.

Naturally - we looked for nested master pages.

This solution would allow us to create a parent master page that all other master pages will inherit and apply our branding and design rules with very little effort.

Problem was that when I tried to inherit blueband.master into child.master things did not work.
The ASPX page that was using child.master could not enter edit mode, and I could not add / remove nor edit web parts in it.

After reading another post on the internet - I accidently found the solution – unghosting the master pages will solve this issue and nested master pages will start working!

All I had to do to make this work is to unghost blueband.master by opening it in SharePoint Designer and saving it – so it was customized.

Done!

So to create a sub master page to blueband.master that only supports editing the PlaceHolderMain area add this code to child.master:


<?xml:namespace prefix = asp /><asp:content id="Content1" runat="server" contentplaceholderid="PlaceHolderMain">
<asp:contentplaceholder id="PlaceHolderMain" runat="server"></asp:contentplaceholder>
</asp:content>

Hope this helps you guys… Good luck.

Thursday, October 25, 2007

SharePoint Tagging – why ?

SharePoint Tagging – why ? Or – why Bring Web 2.0 to SharePoint ?

The answer seems to be obvious – because it’s better!

For the last years, as the Internet evolved, we have seen some interesting trends – the last one we saw (at least one of them…) was “the rise of the Search”.
With the entrance of Google to the market of search engines, the importance of search solutions has become crucial – even to companies such as Microsoft, that found a sudden competition from an unexpected direction.
Suddenly – everyone can just search for a word or a phrase, and the results are there – quick and easy… this has been true for some time, but not in the organizational market.
It has proven to be too complex to manage an efficient search solution for the organization Intranet… too many data sources, too dynamic usage patterns, to many pieces of information that needs to be managed, sorted, indexed etc.

What did we have before ?
Before the search solution came to the game, we had hierarchical order. Every items was place inside a branch on a tree… one dimension of hierarchy, one “view” of information, and all our items can be sorted and found. Apparently – this solution wasn’t sufficient too… hierarchies need to changed here and there, different sorting and access is sometimes required for different users etc.

And so, what we saw on the internet – was the evolving of “Tagging” solutions .

“Tagging” means that you can add any item, locate it wherever you want, and simply by adding a “tag” to it, you can always locate this item, present and access it.


Well, at first, the tagging process should be the easiest thing to do for a user – and indeed it is: just choose a tag by clicking it from a list, and immediately the item is tagged… much simpler than locating a library of a folder on a document library.


Second – provide the users with the simplest tool to locate the tagged items and view those items – and this is the part of the solution called “Tag Cloud” – tag cloud simply presents a cloud of tags in a simple list, with a variable size per each tag according to its usage rate, so when a user choose a tag in the cloud, immediately all items tagged using the chosen tag are presented… again, this is the most simple way of locating information.


Conclusion
The tagging of items and the sorting of tagged items is currently the most convenient way of managing information and knowledge… more than this – as the “free” space of the internet has proven, users prefer this option – both when updating and when searching for information on blogs and WIKI sites.
So why not just provide them with this solution also for their SharePoint ?
Well – there is one by now…
SharePoint Tagging feature solution by KWizCom Corporation.

Tuesday, October 16, 2007

Run code to make changes to all sites in a site collection - code sample

I can’t remember the number of times I had to make the slightest change on all site on the same site collection.
One more loop, one more recursive call… you know…
What am I talking about?
Ever needed to:
· Change a site’s title for all sites?
· Change the email for request access to all sites?
· Cancel request access to all sites?
· Change theme on X number of sites?
· Delete a list from all sites, add another list to all sites, and so on and so forth…
Well, all these needs have one thing in common – they can be easily done using code that iterates through all sites in a site collection.
Writing the long, repeating code that performs this iteration can be very time consuming and redundant.
Here is a code sample that will allow you to run any code you wish on all sites in a collection simple by handling the action you want on one site only. No need to iterate all sites and worry about recursive methods any more.
Simply add this code to you utilities / class code:
#region actions for all webs
delegate void RunForAllWebsAction(SPWeb web);
static void RunForAllWebs(RunForAllWebsAction action)
{
try
{
string rootUrl = GetAppConfigValue("RootWebUrl");
SPSite site = new SPSite(rootUrl);
SPWeb rootWeb = site.OpenWeb();
RunForAllWebs(rootWeb, action);
}
catch (Exception ex)
{
Console.WriteLine("** Error: " + ex.ToString());
}
}
static void RunForAllWebs(SPWeb current, RunForAllWebsAction action)
{
Console.WriteLine("* Starting action on " + current.Url);
action(current);
Console.WriteLine("* Done.");

foreach (SPWeb sub in current.Webs)
RunForAllWebs(sub, action);
}
#endregion


Now, all you need to do is create a function of this delegate:
void RunForAllWebsAction(SPWeb web);
For example to add “class number: ” to each site on the classes site collection, create this delegate only:
void ChangeTitle(SPWeb web)
{
web.Title = "class number: " + web.Title;
web.Update();
}


And you are done.
(Note that I have only added 2 lines of code to make the change I wanted…)

To make a call to run ChangeTitle on all webs call this:
RunForAllWebs(ChangeTitle);

Well, hope this helps the developers in you,
Shai Ben Shooshan.

Wednesday, August 29, 2007

Manage Publishing Page Nodes in Site Navigation

Hi all,
What I am publishing here is some undocumented issues
involving navigation items in publishing enabled sites.

When you have publishing feature enabled in MOSS sites publishing
pages from “pages” library automatically set to be displayed in navigation. So far
– nothing is new.

What you didn’t know is that when you try to access these
items in the site’s navigation in order to perform a simple task such as hiding
a page from navigation, changing a page’s display order and other tasks
you are in to a nasty surprise!

What you want to do is to:

A: Get an instance of the current web site (SPWeb web = SPControl.GetContextWeb(Context) from within a web part.

B: Get the left navigation nodes collection (using web.Navigation.QuickLaunch)

C: Loop over navigation items and move/hide/rename etc… (foreach(SPNavigationNode node in web.Navigation.QuickLaunch))

But wait –

If you just created the site and added some pages to it you
are in to a nasty surprise as I promised. You will notice that
none of your
pages
that are displayed in the navigation are in that collection!

Actually the collection should be empty unless you added
some other items to it manually.

You will also notice a very weird behavior of
SharePoint that as soon as you open the “Navigation” page in the UI of
that site and make any change and save it – since that change all items
suddenly
appear in the navigation collection
as you expected them to from the
beginning!

My customer and I had to create pages and sites by code and
change their ordering by the same code. Of course we didn’t plan on browsing
each site and making a change manually – so we had to find a solution for that
issue.

The following code fixes that “problem”. It goes over a publishing
site pages library and make sure that all pages navigation nodes were created
and available for change using your code.

This took me quite a lot of time to investigate and find
this solution since it is not documented anywhere!!! So enjoy…

SPWeb curWeb = GetWeb();
PublishingWeb pWeb = PublishingWeb.GetPublishingWeb(curWeb);
//Get existing links in navigation
//(so we know if to create new or move existing link)
List<string> existing = new List<string>();
foreach(SPNavigationNode node in curWeb.Navigation.QuickLaunch)
existing.Add(node.Url.ToLower());
//Loop for each page in pages library
foreach(SPListItem item in pWeb.PagesList.Items)
{
//Get a fresh copy of web – curWeb =
//new SPSite(curWeb.Site.ID).OpenWeb(curWeb.ID);...
curWeb = Utilities.Refresh(curWeb);

PublishingPage pp = PublishingPage.GetPublishingPage(item);
SPNavigationNode nn = null;
string ppUrl = pp.Uri.AbsolutePath.ToLower();
//check if exists in navigation
if (existing.Contains(ppUrl))
{
continue;
}
else//add a new navigation item
{
//not? add it.
nn = new SPNavigationNode(pp.Title, ppUrl);
nn = curWeb.Navigation.QuickLaunch.AddAsFirst(nn);
//here is the trick –
//We mark the navigation item as type “Page”.
nn.Properties["NodeType"] = "Page";
nn.Update();
}
curWeb.Update();
}

Wednesday, August 15, 2007

Managing Field Control Visibility - a step towards field level security and much more

Hi all,
Many times I face the same problems with almost all my customers.
In some point it seems they all want more controls over fields in the “edit” and “new” item form.
Some want to hide it from unauthorized users; others want to give a field a default value that changes according to the current user, and even some more interesting things like filtering values in choice fields to answer some complicated logic.
So one way to support all these whims is to develop new field types with field controls to mach – you can find plenty examples for that on the web (like our soon-to-be-released tags field type).
Here I want to show a simpler solution that involves only editing the edit/view form of the list and make use of very simple javascript code to get control over the client-side HTML element of each field.
One more thing – although we can create a custom list form using the SharePoint designer to hide controls there is a major disadvantage in using such a custom list form. If your user will add a new field in the future it will not show automatically in the edited form and you will have to edit these forms every time your user changes the list.
This code I wrote with the help of Sveta (thanks) expects the field display name and look for it in the HTML while it assumes a comment tag with the field name will exist right above the field itself.
Here is the code:
var ctrl = null;
//Place this code right AFTER the list view web part.
//To go into edit mode of the page,
//in case you dont have the edit page menu paste this in the browser's address bar:
//javascript:MSOLayout_ChangeLayoutMode(false)
function foo()
{
var ctrl = null;

var arr = document.getElementsByTagName('!');//get all comments

for(var i=0;i<arr.length;i++)
{
try
{
var html = arr[i].innerHTML;

if(
html.indexOf("field to hide 1") > 0 ||
html.indexOf("field to hide 2") > 0
)
{
ctrl = arr[i].parentElement.parentElement;
ctrl.style.display="none";
}

}
catch(e){alert(e.description);}
}
}
foo();


Doing this allows you to keep the default list form and still get some control of the desired field element. I usually wrap this code in a custom control that analyzes on the server side what needs to be done (hide element, replace with another or filter a combo box) and make use of the code above to complete the job on the client site. For example if I want to achieve a field level security for any SharePoint list field my server control will test the user permissions and will hide the control if the current user does not have enough permissions.
Hope this could help some of you guys,
Shai Petel.

Wednesday, August 1, 2007

Variations Menu - switching between a page variations

Hi all,

I got to do quite a lot of work using MOSS WCM variations for creating translations of pages and sites to different languages.

Having the microsoft VM i noticed that whenever I created a new variation to a page a manu would show at the top right of the page and allow me to switch between all variations of that page.

To my (rather big) surprise I found out that when I did the very same procedure on my customer's production server variations did work ok and translated my pages but I did not see the variations menu and could not navigate from one variation of the page to another.

Looking at the master page I did see the variations menu control (<PublishingVariations:VariationsLabelMenu id="labelmenu1" runat="server"/>) was in place but it did not render any HMTL...

After some googling me and shlomy (my customer from IDC) did we learned that the variations menu control uses a user control (ascx file) to display the items, and that by default this control is commented out inside the ascx (?!?!?!?)

What I had to do in order to make the variations label menu visible is to open "VariationsLabelMenu.ascx" that is in "C:\Program Files\Common Files\Microsoft Shared\web server extensions\12\TEMPLATE\CONTROLTEMPLATES\" and remove the comment text wrapping the control <%!-- and --%>

Now everything works!

Why is it turned off by default? Have no idea. But in 2-3 minutes you'll have your site's variations labe up and running and your users will be surfing between page translations in no time!

Hope this helps, will update if I find a reason to turn it off since I didnt find one yet.

Shai Ben Shooshan

Sunday, July 22, 2007

Manage site/list/item permissions in SharePoint from C#

Hi guys,

I have a little code bit that allows you, once you have a permission level defined in your SharePoint site, to change a site/list/item permissions using C#.

As you may or may not know, WSS 3 and MOSS 2007 handles security in 3 levels:
1 - Permission - which cannot be used directly to give access to a user
2 - Permission Level - which can be used to give access to a user or to control a SharePoint group access
3 - SharePoint Group - which is much like a cross site group that handles permission levels and user assignments to a group that can be used in several sites in the same site collection that does not inherit permissions, but share the same contributors/readers etc.

This code allows you to break the permissions inheritance of a site / list / item and assign a user to a permission level on that object only.

So, without further ado, here it is:


public static void CreatePermissions(SPWeb theWeb, string loginName, string roleName, string permissionLevel)
{
try
{
theWeb = new SPSite(theWeb.Site.ID).OpenWeb(theWeb.ID);
theWeb.AllowUnsafeUpdates = true;

SPRoleAssignment roleAssignment = new SPRoleAssignment(loginName, "", roleName, "");

SPRoleDefinition RoleDefinition = theWeb.RoleDefinitions[permissionLevel];

if (!roleAssignment.RoleDefinitionBindings.Contains(RoleDefinition))
roleAssignment.RoleDefinitionBindings.Add(RoleDefinition);

//Check inheritance
if (!theWeb.HasUniqueRoleAssignments)
{
theWeb.BreakRoleInheritance(false);
}

theWeb.RoleAssignments.Add(roleAssignment);

//If user already exists - update its display name
try
{
SPUser user = null;
user = theWeb.Users[loginName];
user.Name = roleName;
user.Update();
}
catch { }

theWeb.Update();
}
catch (Exception exc)
{
}
}

public static void CreatePermissions(SPWeb theWeb, SPListItem ListItem, string loginName, string roleName, string permissionLevel)
{
try
{
theWeb = new SPSite(theWeb.Site.ID).OpenWeb(theWeb.ID);
theWeb.AllowUnsafeUpdates = true;

ListItem = theWeb.Lists[ListItem.ParentList.ID].GetItemById(ListItem.ID);

SPRoleAssignment roleAssignment = new SPRoleAssignment(loginName, "", roleName, "");

SPRoleDefinition RoleDefinition = theWeb.RoleDefinitions[permissionLevel];

if (!roleAssignment.RoleDefinitionBindings.Contains(RoleDefinition))
roleAssignment.RoleDefinitionBindings.Add(RoleDefinition);

//Check inheritance
if (!ListItem.HasUniqueRoleAssignments)
{
ListItem.BreakRoleInheritance(false);
}

ListItem.RoleAssignments.Add(roleAssignment);

ListItem.Update();

}
catch (Exception exc)
{
}
}

public static void CreatePermissions(SPWeb theWeb, SPList list, string loginName, string roleName, string permissionLevel)
{
try
{
theWeb = Utilities.Refresh(theWeb);

SPRoleAssignment roleAssignment = new SPRoleAssignment(loginName, "", roleName, "");

SPRoleDefinition RoleDefinition = theWeb.RoleDefinitions[permissionLevel];

if (!roleAssignment.RoleDefinitionBindings.Contains(RoleDefinition))
roleAssignment.RoleDefinitionBindings.Add(RoleDefinition);

//Check inheritance
if (!list.HasUniqueRoleAssignments)
{
list.BreakRoleInheritance(false);
}

list.RoleAssignments.Add(roleAssignment);

list.Update();

}
catch (Exception ex)
{
}
}

Sunday, July 8, 2007

Adding a filter combo-box web part as you wish

Its been a while, not that I didnt have what to write about (I have loads - believe me), just had no time...

I want to share a simple solution for filtering list views I did for a customer that could help some of you guys.

I had a customer that needed a combo box web part (simple) that will hold several values for filtering other list viewers web parts on the same page.

Well, obviously we have our "SharePoint List Filter - Multiple Drop-Down" web part from our site for download, but here I was aiming for a simple solution that will not take values from fields automatically and did not need all the benifits of a product such as that (as great as it may be).

So, what I did was to add a content editor web part that will hold the HTML code for the drop-down list with all its values. On each change I passed the selected value to the query string and posted the page.
Here is the code for that web part:

select value: <select id="cmb_WPQ_" onchange="onChange_WPQ_(this);">
<option value="">select...</option><option value="value 1">option one</option>
<option value="">select...</option><option value="value 2">option two</option>
</select>
<script>

function onChange_WPQ_(ddl)
{
for(var i=0; i<ddl.options.length; i++)
{
if( ddl.options[i].selected )
{
view = ddl.options[i].value;
selected = i;
break;
}
}

if(view == '') return;

window.location = window.location.href.split('?')[0] +
'?view=' +
escape(view) +
'&selected=' +
escape(selected);
}

function onLoader_WPQ_()
{
try
{
if( window.location.href.indexOf("&selected=") > 0 )
{
var selected = window.location.href;
selected = selected.slice(selected.indexOf("&selected=") );
selected = selected.replace("&selected=","");
document.getElementById('cmb_WPQ_').options[selected].selected = true;
}
}
catch(e)
{}
}


onLoader_WPQ_();

</script>

(paste this code in the HTML editor of a content editor web part)

Now, when this takes care of showing the drop down list and sending information for the selection to the query string all I have to do to make this play is to add a query string filter web part (comes out of the box), set it to take "view" query string key and connect it to the list viewer web part I want!

This way I can use simple HTML web part as filter providers for more advanced solutions with no real .NET development.

Hope this helps, feel free to comment if you have question.

Friday, June 15, 2007

Creating a new discussion item on Discussion Board

Hi all,

Ever tried to use C# to add list items to Tasks list? Annoumcements? piece of cake.

To a Document Library? saving a file, updaging meta data - no problem.

But - did you ever try to create a new discussion on a Discussion Board? Well, there is more to it than you think.

My customer had me create a new discussion automatically for every task created on the site. This way - when ever you assign a task to a group or a person they can communicate with each other and work a solution together.

Doing a little research i found that creating a new discussion is a bit different than working with a normal list that we are used to.

First you must create a new discussion using the SPUtility.CreateNewDiscussion method.
This method reiceves the name of the discussion and the SPListItemCollection of the SPList item representin the discussion.

well, for example if you have a discussion boared called "What say you" your code should look like this:

SPList list = web.Lists["What say you"];
SPListItemCollection myListItems = list.Items;
SPListItem d = SPUtility.CreateNewDiscussion(myListItems, "Talk about Task X");
d["Body"] = "What say you about task X?";
d.Update();

And a reply will look like this:

SPListItem r = SPUtility.CreateNewDiscussionReply(d);
r["Body"] = "Looks interesting... Doesnt it?";
r.Update();


Well, hope this helps...

Anonymous Users cannot access list views in MOSS Publishing sites

Hi All,

Again, I am posing you something I came across during a visit at one of my customers.

We are creating an internet portal based on MOSS Publishing WCM template. This portal is ment to be public and to allow anonymous users from the internet to view most of its contents.

But - as you may or may not know, anonymous users on WCM sites cannot view a list or library view pages, although they can browse directly to the document or list item when given the correct url. When trying to do so - they are prompted for user name and password... Also - and this is the main reason I had to look for a solution - when I added links to the documents into the current navigation of the site they did not appear for anonymous users.

After doing some investigation on the net I came across this KB #927082 on microsoft support site that explains this.

Apperantly all WCM sites are initialized with a special hidden feature that denies anonymous users from accessing dall and un-attactive SharePoint-like pages that does not fit a sexy-designed internet site.

This feature is called: "ViewFormPagesLockDown" and disabling it allows anonymous users to go around the site as I expected.

To disable this feature you must log on to the server and follow these steps:
1. Click Start, click Run, type cmd in the Open box, and then click OK.
2. Type the following lines at the command prompt. Press ENTER after each line.
cd /d %commonprogramfiles%\Microsoft Shared\Web Server Extensions\12\Bin
stsadm -o deactivatefeature -url http://ServerName -filename ViewFormPagesLockDown\feature.xml
3. Type exit to exit the command prompt.

After disabling this feature, you must turn anonymous access off and on again for changes to take effect.

Note: if you want it off only for one library or list like in my case, you can disable it, turn anonymous access on at that specific list and enable the feature again, leaving only that list opened for anonymous...

Wednesday, June 13, 2007

Run code with full control - no impersonation needed!

Hi all, I am writing this post very exited of a new discovery I have no idea how I missed so far. Every now and than I get to a point in SharePoint that I have to perform some administrative task in the back ground as a result of a reader / contributor action. For example, if i wanted to have a site counter web part, all I needed to do is to update a web.properties[Counter] = lastCounter + 1; when a new user enters my site. But - updating web.properties is not something anonymous or a reader can do, can they? So - my solution was to create a hidden list with write access to every user and make them write there... Bad idea, i agree. But up untill now - it was the only solution I could think of. Now - after coming across this page in MSDN I can make my web part run a small bit of code as a privileged used.

All I have to do is to create a delegate methond of type "SPSecurity.CodeToRunElevated" and make "SPSecurity.RunWithElevatedPrivileges" run my method in full access mode!
Your code should look something like this:

protected void Button1_Click(object sender, EventArgs e)
{
SPSecurity.CodeToRunElevated elevatedGetSitesAndGroups = new SPSecurity.CodeToRunElevated(GetSitesAndGroups);
SPSecurity.RunWithElevatedPrivileges(elevatedGetSitesAndGroups);
}

Well, it is too simple to believe... but I know what you are thinking... security breach!

First we have to remember, code running this method must have full code access security trust, I.E have a strong name signing and be installed into GAC folder, so there is little reason for alarm, but still I will investigate this issue further and post my results.
Till then, take care.

Thursday, June 7, 2007

Creating Custom Action for SharePoint Designer Workflow problem

First let me start by saying I am not going to tell you how to create a custome action. There are many available examples online that you can find, and I may be publishing a little "how to" myself in the future.

For those of you who created a custom action, you may or maynot have noticed that when you do a custom activity, configure it to use Lookup fields on field configured as DesignerType="StringBuilder" and instead of field value you get [%_x005f_String0%] you need to "tell" SharePoint to replace your tokens (look up fields) with the actual values on that workflow.

A good example was when I was trying to develop an action that will work like the "send email" action, only included some changes.

I got this error in the "body" field of the email i wanted to send.

The solution is rather easy to implement and consists of 2 steps:
1 - First you have to define a new property to your activity - the workflow context:

public static DependencyProperty __ContextProperty = DependencyProperty.Register("__Context", typeof(WorkflowContext), typeof(EmailActivity));

[ValidationOption(ValidationOption.Optional)]
public WorkflowContext __Context
{
get
{
return (WorkflowContext) base.GetValue(__ContextProperty);
}
set
{
base.SetValue(__ContextProperty, value);
}

2 - Second you will have to your Execute method:

protected override ActivityExecutionStatus Execute(ActivityExecutionContext provider){
Activity parent = provider.Activity;
while (parent.Parent != null)
{
parent = parent.Parent;
}


string returnValue = Helper.ProcessStringField(stringToProcess, parent, this.__Context));
}


You don't want to know how I learned that, so don't ask...

Creating a A-Z filter for a list

My customer wanted to have a library list, for adding books.

We had a title field for the book and some other meta data for each book.

He wanted to have a page where users could filter the list to view all books starting with A,B,C...Z

Something that will look like:
A,B,C,D,E,F,G,H,...Z

And a list grid below that will filter all books starting with the selected letter.

I found a rather easy solution for that that needed no code at all - only customization!

Basically what I did was:
1 - Add a calculated column that will hold only the first letter of the Title field.
(fomula for this: =LEFT(Title,1) )
2 - Then I added the list grid web part.
3 - To add filter support I added above a rich text web part and added the HTML for A,B,C...Z and made each letter a hyperlink to the same page with adding "?FilterBook=A".
4 - Now, all i had to do is to add a query string filter web part (comes with SharePoint) and configure it to take the filter value from "FilterBook" query string and send it to filter the list grid web part below.

Done!

No code solution that took no more than 10 minutes!

Customer happy, me happy :)

SharePoint Designer Deployment Issues #2

Hya all...

as time go by I encountered another annoying issue with working with SharePoint Designer and creating WSS site template.

What I had to do is define several workflows in a template site and replicate that site using an STP template file.

Apparently that every change you make to the workflow in the designer advances its version number in one of the XML files on the workflow, and when that happens you will get an error whenever you start a workflow on any site created from that template.

I found a workaround for that, opening the workflow and clicking "finish" solved that error, but to do that on every site I created on automation? I don't think so.

Well, the guys at Microsoft were kind enough to find a more usable solution for that. Apparently all I have to do before I save the site as a template is to reset the version number to 1:
· Open the .wfconfig.xml file for every workflow in your ‘workflows’ folder
· Edit the ‘RulesVersion’ attribute to have a value of “V1.0”
· Deploy the site template

(With thanks to Jordan Hull)

This seems to solve the problem for good and not all workflows are working as I expected!

Hooray!

Sunday, May 27, 2007

SharePoint Designer Deployment Issues

Hi All,

Many of you may already noticed (the rest are in for a big surprise) that when creating team sites while using SharePoint Designer there are several issues that prevent saving the site as a template and creating sites from it.

When you are using a Data View Web Part (DVWP) or the Workflow Designer, your sites created from the template will show a generic error and will ask you to open and fix the problem using SharePoint Designer.

For example, if you are adding a list view web part and right click->convert it to xslt data view web part it will work fine. But if you used the "Data view" menu at the top -> insert data view and then connected it to a list/library - your DVWP will throw this error when saving it as a site template.

After much searches for a solution the WCM dev team came up with a solution that explained the reason for this problem.

Apparently when you are creating any list references (for example: lookup field, dvwp on a list, workflow etc) all list references are represented as the list's GUID.

When saving a site as a template the GUID is marked for replacement on all new sites created from this template. After creating a new site from that template all marked GUIDs are replaced with the new GUIDs of the new lists on the new site.

So - where is the problem? Apparently in very few cases the list GUID is stored as ListID=GUID, and not as it should be - ListID= {GUID}. When the GUID is not wrapped in {} the SharePoint replace mechanism does not recognize the list id and does not mark it for replace...

The fix for this is rather easy, after adding a WF or a DVWP all you have to do is to dive in the ASPX or XML and wrap all GUIDs with {}...

Believe it or not - this actually saves the day and things are starting to work!!!

There are talks of fixing it in service pack (SharePoint or Designer? don't know...) but for now this is the only way I know of.

Hope this helps you guys; it sure did take a lot of my time finding this solution so I'd thought I'd share...

Saturday, May 26, 2007

If you cannot compile an audience and get no error

Description:
Recently I was at a customer site where we were implementing a MOSS based solution. while moving to the production - after a backup and restore process we tried to create several audiences and when we tried compiling them they did not compile successfully but we got no indication for an error.

After a quick view at the server's event viewer – we found some SharePoint error message like: 'Failed to compile 'my audience' audience. Exception was: 'Failed to obtain crawl status.'

A quick search reveled that during the restore process our SSP (SharedServicesProvider for MOSS) did not have a search indexer defined.

In order to fix this problem what we had to do is:
1. make sure the office SharePoint services search service is active on our farm (in central administration->operations->services on server)
2. Go to central administration->application->configure the SSP we are using and select search indexer server from the drop down list (after step 1 this options should not be empty)
3. Done.

Now the compilation could be completed!

Hope this helps you guys,

Shai Ben Shooshan
SharePoint TechnologySpecialist
KWizCom Knowledge Worker Components
shai@kwizcom.com
http://www.kwizcom.com

Thursday, May 17, 2007

Creating an advanced search on a list

If you ever wanted to have an advanced property search on a SharePoint list – your worries are now over.

Almost all SharePoint lists views supports having a filter-combo box above them. Only you have to show the toolbarin order to use it and it hides the filter boxes by default.

here is a little javascript code snippet that will force the list web part always show the filter combo boxes and thus providing property-based search on your list.

All you have to do is add a content editor web part to your page and add this javascript to its source editor:


<script>
function NewSubmitFormPost(url)
{
if( url.indexOf("?") > 0 )
url += "&";
else
url += "?";
url += "Filter=1";
OrgSubmitFormPost(url);
}

var OrgSubmitFormPost = SubmitFormPost;
SubmitFormPost = NewSubmitFormPost;

if( window.location.href.indexOf("Filter=1") < 1 )
window.location.href = window.location.href + "?Filter=1";

</script>


This little code bit sure saved me some long development hours...
:)

Monday, May 7, 2007

Using FrontPage Data View Web Part Without Un-Ghosting the Page

Introduction to FrontPage data view web part:


This article will demonstrate how users can make use of the powerful data view XSL Based web part without having to pay the cost of un-ghosting the page like using FrontPage normally do.
This web part has many exiting features and can save hundreds of development hours by creating a data view web part that can connect to various data sources such as:
· Web Services
· Databases
· Excel Files
· XML Files
· SharePoint Lists
Plus it offers a great deal of formatting feature like:
· Filter
· Conditional Formatting
· Sorting
· Field Format (display as link Etc.)
Now, as if this was not enough – this cool web part also exposes a provider and consumer web part connections to enable us creating an interactive solution.

Why am I telling you this?


Well, being an experienced SharePoint solution provider or a newbie you must know all about this feature provided by FrontPage.
Also – you must of heard the warning about using FrontPage on your SharePoint site pages – you don’t want to regret un-ghosting the files from the template, do you? – well, in most cases you cannot afford this price.
For more information about ghosting or un-ghosting pages please see this blog for example.
Well, there is a secrete way you can utilize this powerful tool (FrontPage) to construct the data view web parts you want and use them in your page with no need to un-ghost the page. Sound exiting? Tricky? You will be amazed to learn how easy it is!

Solution Description


Quick Overview


For those of you who are experienced with using both SharePoint and FrontPage, here I will lay down the principal of the solution. You may find it inspiring for more other solutions based on the same concept like I did.
What we want to do in order to achieve our goal is to create a playground.aspx page on our site. Then we will use FrontPage to add edit and change the data view web parts and save the page.
So far – normal FrontPage unwanted work. But not to worry – here comes the big change:
After we have finished creating the web parts, connecting them and customizing the XSL code if needed we will browse to our playground.aspx page using the internet explorer and export these web parts to a DWP file.
All we have to do now is browse to our default.aspx page, import these web parts and what do you know – we have them up and running with no un ghosting taking place.
Tip: you can use the Data Transformation Services to create views to remote lists as well.
The playground.aspx file can now be deleted.

Our Solution Step-By-Step


1. Open FrontPage
2. Nimrod – Please add steps to adding a data view web part
3. Save the page and close FrontPage
4. Open the page you created in the browser
5. Look for the Web Part you added using FrontPage earlier
6. In the web part menu you’ll find the “Export” option – click it
7. This will download a “.DWF” file to your local PC, save it with the web part name
8. Browse back to the original page you wanted to add the Web Part to, Click Add Web Parts
9. Select “Import option
10. Click Browse and select the “.DWF” file you saved earlier
11. Click upload
12. The Web Part will be loaded to the tool pane, drag and drop it anywhere on the page to use it
13. Done!!!

Summary


Hope you find this useful and finally we will start making use this great tool – FrontPage. These guys did a great job and we can benefit very much from the tools available there.
And guys – feel free to contact me if you have any questions or if there were something obscure in here…

Enjoy,

Shai Ben Shooshan

Adding a new content query report

Many of my customers are experiencing problems during the creation process of their publishing portals in MOSS 2007 WCM enabled sites.
The two main issues I found are not having an easy way to check-in and publish/approve all pages we developed at once (very much needed when building a new site) and the ability to view all checked out documents in my site collection – just so we could know where we stand in our publishing process.
For the first problem I had to write a nice utility (I will try to publish it for free soon… promise! When finished it will be available here: http://www.kwizcom.com/ – look for the free stuff), but for the second issue I found a simple solution that asked for no more than few seconds of "hard labor" to solve.
(by that I mean some googling was needed)
Well, you might of noticed content editing enabled sites have some reports in their site settings menu:


Clicking one of these menu items will bring you to the manage content and structure page, where a search will be performed on all items according to the report you wanted.


Now, adding a new report to this list turned out to be really easy. All I had to do is click the "content and structure reports" list under the root site and there I found all queries there with their CAML code!


So – to add a new search that will show all items that are checked out to any user simply add a new item there and set this as the CAML for the item:
<where><isnotnull><fieldref lookupid="TRUE" name="CheckoutUser"></isnotnull></where>
Now, this is not perfect yet, you could limit this query to lists/libraries etc… but hey – I have to leave something for you guys to write about, no?
Hope this helps some of you guys, don’t forget to vote!


Shai Ben Shooshan
shai@kwizcom.com
KWizCom Canada

Sunday, May 6, 2007

Adding the quick launch to team site pages

Hi All


Ever tried to add a new page in a WSS Team Site?

Well, after you create a new page, using the "Create web part page" wizard:


you probably noticed the following issues:

1. You have to create a document library to store them (unless you save them in "Shared Documents" library, but we wouldn't want to mix documents and site pages, would we?)

2. They look different from the team site's home page - where did the quick launch go??


OK, so the solution is quite simple, and there are 2 cases here:


1. If you have MOSS 2007 - All you have to do is to activate the "Office SharePoint Server Publishing" feature for your team site. Once you activate this feature, the team site will have some publising site features: a new "pages" library will be created, and all new created pages will be automatically stored in this library. In addition all pages will display the same "envelope" - including the missing quick launch on the left side of each page.

The only problem with this solution is that now every change you make requires publishing, and this is certainly NOT a natural part of team-site working flow.


2. If you only have WSS installed - in this case you don't have the "Office SharePoint Server Publishing" feature installed. however, you can change the team site page templates, and have them display the quick launch. This is quite easy to implement, so here it goes:
  • Browse the "C:\Program Files\Common Files\Microsoft Shared\web server extensions\12\TEMPLATE\1033\STS\DOCTEMP\SMARTPGS" folder on the SharePoint server.
    This folder contains all templates that you see in the "New Web Part Page" wizard:


  • Every page inherits the same team site's master page, and all of them override this master page's placeholder tags. This is why the quick launch is not displayed in new pages created in a team site (don't ask me why it was done like this, I don't have a clue..).


  • Simply delete the "PlaceHolderLeftNavBar" content tag in the required templates and save the file/s:


That's it!


Now, create a new web part page, based on the template you have just changed, and notice that the quick launch appears exactly as it is in the home page.

One last thing to remember:

Since the changes are done in the file system, these changes apply to all team sites on your SharePoint server.


Nimrod Geva
KWizCom - Knowledge Worker Components


Friday, May 4, 2007

UTF-8 with signature?

Few days ago I was at my customer and we witnessed a wired behavior of excel.

We wanted to display data in excel from the web, so that when you click a link excel will open and display some data in it (not within explorer).

Doing this is pretty simple, all we have to do is create a data grid control, bind it to a data source and let it render.

When we want it to open to excel we have to replace the "pre-render" method with this simple code:
Page.Response.Clear();//clear other HTML form response
Page.Response.AddHeader("Content-Disposition", "attachment;filename=StudentsList.xls");//to open in excel
Page.Response.Charset = "65001";//for UTF-8
myDG.RenderControl(writer);//render grid HTML
Page.Response.End();//End response here.

This works great for most cases.

My client had to display some non-English characters that were all UTF8 encoded. When saving the result HMTL in notepad using UTF8 excel was able to display the special chars ok, but when using the code sample above - we got some wrong data.

After googling around for a while i managed to understand that excel must use UTF8 with signature text and i had to add a signature to it.

So - how do I signature my file as UTF8???

Some more googling allowed me to learn that all I needed to do is add these bytes to the start of the file:
0xEF, 0xBB, 0xBF

Using C#, here is the complete and correct way to do this:

Page.Response.Clear();
Page.Response.ContentType = "application/vnd.ms-excel";
Page.Response.AddHeader("Content-Disposition", "attachment;filename=StudentsList.xls");
Page.Response.Charset = "65001";
byte[] b = new byte[] { 0xEF, 0xBB, 0xBF };
Page.Response.BinaryWrite(b);
myDG.RenderControl(writer);
Page.Response.End();

Now everything should be rendered okay and my file is saved with UTF8 with signature!!!

Hooray!

Well, hope this helps, since I didn't manage to find any document that explains this I thought it might help if I publish one...

Peace, Shai.

Tuesday, May 1, 2007

Un Documented Navigation Control using C#

Hey All,

I run into a requierment during a site creation automation at one of my customers.
In this automation we had to dynamically add links to the site's navigation only to learn that the sharepoint API for this is not what I expected.

What i needed is to do some simple things (or so i tohught) like adding header items, adding items with no link, specify links to open in new window etc...

well i came across some undocumented things that helped me do these not so simple tasks... I added here some of the code I used so it may help so of you out there.

I wanted to add navigation controls like:
· No link (href) for new navigation item (not as simple as you thing… I wanted it not to behave as a link.)
· Add a link that will open in new window
· Create a container navigation item to hold several child links
All of these are fairly simple to do using the UI, but not so simple when using code to create the links.
I did manage to control each of these features using navNode.Properties
Now, I could not find any documentation regarding how we suppose to do it, so what I had to learn myself is not documented so far anywhere I looked.

Now, with no further ado, here are some source code samples I collected:
Use this to add a container with no link:
navNode = new SPNavigationNode("Container", null, true);
navNode = CourseWeb.Navigation.QuickLaunch.AddAsLast(navNode);
navNode.Properties["UrlFragment"] = "";
navNode.Properties["NodeType"] = "Heading";
navNode.Properties["BlankUrl"] = "True";

Use this to add a link in the container:
SPNavigationNode tmpNavNode1 = new SPNavigationNode(LinkName, LinkUrl, true);
tmpNavNode1 = navNode.Children.AddAsFirst(tmpNavNode1);
tmpNavNode1.Properties["Target"] = "_blank";
SPNavigationNode tmpNavNode2 = new SPNavigationNode("Second link", "link url", true);
tmpNavNode2 = navNode.Children.AddAsLast(tmpNavNode2);
tmpNavNode2.Properties["Target"] = "_blank";//open in new window

navNode.Update();
tmpNavNode1.Update();
tmpNavNode2.Update();
CourseWeb.Update();

Well, I know I spent a lot of time to find how and what to do… could it be that SharePoint team cut few corners in the API?

Anyway, hope this helps some of you developer guys,
Shai Ben Shooshan

Tuesday, April 10, 2007

“The return of the .stp language converter”

Hello everyone,

I assume you have all heared about the
"Fantastic 40" - 40 Application Templates for Windows SharePoint Services 3.0, released by Microsoft.
The good news is these are really beautiful templates that provide both good ideas and initial starting point for implementing and deploying WSS sites for various business needs.
The bad news is that these templates were published only in 10 “chosen“ languages (in addition to English): French, Italian, German, Spanish, Portuguese, Japanese, Korean, Hebrew, Chinese simplified and Chinese traditional.
To be more accurate, not all the 40 templates were released in these 10 languages, but only part of them (the Core templates).

Well, about a year ago I have published a tip:
Changing the language of a site template (.stp) file that describes how to translate a site template file (.stp) to a desired language, along with a freeware utility.
So, finally I can happily inform that the new version of the .stp language converter utility is ready for MOSS 2007/WSS 3.0.

Download the new freeware version from:
http://www.kwizcom.com/ContentPage.asp?PageId=165


Welcome

new post will come soon!!!